
macOS Mojave introduces several new features that enhance the overall user experience, making it more productive and enjoyable. One standout feature is the dark mode, which reduces eye strain during late-night work sessions. In addition to the dark mode, macOS Mojave prioritizes enhancing existing features rather than introducing entirely new ones. If you’re wondering how to take a screenshot on a Mac or if there’s a print screen feature for Mac, rest assured that there are multiple methods available. Let’s explore how to screenshot on Mac:
How to Screenshot on a Mac
macOS has had screenshot capability for as long as I can recall. With macOS Mojave, Apple enhanced this feature to enable swift screenshot capture and annotation. This article demonstrates Mac screenshot techniques, along with adjusting format and destination preferences. Let’s begin!
Capturing Screenshots with Keyboard Shortcuts
macOS Mojave simplifies screenshot capture. Former macOS users recall the old grab tool, now replaced by “Screenshot.” Launching the app or using keyboard shortcuts grants access to various screenshot tools. Keyboard shortcuts offer swifter access, so here’s how to utilize them:
1. Capturing Mac Desktop (Full Display)
To screenshot your entire Mac desktop, press Command+Shift+3. macOS Mojave instantly captures the screen.
2. Capturing a Portion of the Display
If you don’t want to capture an entire desktop and just want to take a partial screenshot on Mac, press:
Once you hit the shortcut, the mouse pointer turns into a small screenshot tool. Drag to cover the area you want to capture and release. It will automatically take the screenshot.
3. How to Screen Capture a Mac Window in macOS Mojave
- press command + shift + 4
- Once the screenshot tool appears, press space bar.
- Your cursor now turns into a camera and the app you hover over will have a blue overlay.
- Move your cursor to hover over the window you want to screenshot on your Macbook and click on it.
Once done, the app will automatically capture the screenshot of the app’s window as shown below.
Launching the macOS Screenshot Tool
- Open Spotlight and launch the Screenshot app.
- Alternatively, press command + shift + 5 on your keyboard.
Upon launching, you’ll find five buttons. Hover your cursor above each icon to understand their functions. From left to right:
- Capture Entire Screen (Same as Command+Shift+3)
- Capture Selected Windows (Same as Command+Shift+4 + Space Bar)
- Capture Selected Portion (Same as Command+Shift+4)
- Record Entire Screen
- The first three are the screenshot features, previously discussed. Options four and five involve screen recording, ideal for creating video tutorials. Note that no keyboard shortcuts are available for these features; you’ll need to launch the macOS screenshot app.
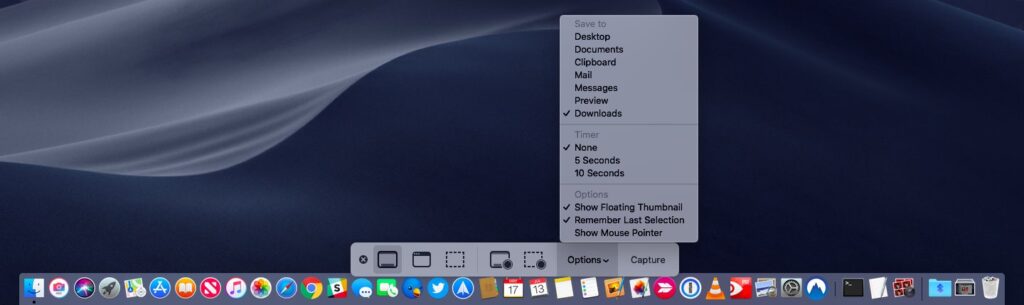
Using Timers for Mac Screenshots
- Launch the macOS Screenshot tool and click “Options.”
- Select a timer duration: 5 or 10 seconds.
- Click “Capture” when ready.
That’s it, macOS Mojave will automatically take the screenshot once the timer expires.

Annotating Screenshots in macOS Mojave
After learning how to take a screenshot on a Mac, let’s explore annotating screenshots in macOS Mojave. In macOS Mojave, a small window appears in the bottom right corner of the screen whenever you capture a screenshot.
To annotate a screenshot, click on the window to open the screen annotation tool. Utilize the toolbar at the top to annotate the screenshot to your preference. Once you finish, tap the “Done” button to save the annotated screenshot.
Changing Default Screenshot Location in macOS Mojave
- Launch the screenshot tool by either opening the Screenshot app or using the keyboard shortcut Command+Shift+5.
2. Click on the Options button. You will see various options, the first being “Save to”. To change the save location, either select the options or click “Other Location” to choose your own.
Changing Screenshot File Format in macOS Mojave
- Open the terminal, paste the following command, and press enter/return.
defaults write com.apple.screencapture type jpg
Your screenshots will now be taken in JPG format. To revert back to PNG, replace “jpg” with “png” in the terminal command and repeat the process. Similarly, change the format to PDF by using “pdf” in command and so on.
Top Third-Party Apps for Mac Screenshot
While macOS includes adequate screenshot tools for most users, some prefer dedicated third-party options for added features. If the macOS tool lacks desired features, consider these 3 top apps for screenshots in macOS Mojave:
1. Monosnap
Monosnap, my preferred third-party screenshot app, combines power and affordability. It resides in your Menu Bar for seamless screenshot capturing of your desktop, apps, or anything else. What I love most is how screenshots open automatically in an editing window, facilitating quick adjustments to filenames, formats, and annotations. If you seek a reliable third-party screenshot solution, Monosnap is worth trying.
2. Snagit
If you seek a powerful macOS screenshot tool for professional use, Snagit stands out. Priced at a premium, Snagit serves as an all-in-one solution for MacBook screenshot needs. It captures the entire desktop, parts of it, and app windows. Notably, it enables capturing entire web pages through its scrolling screenshot feature. Additionally, Snagit includes a built-in editor for comprehensive screenshot editing, not limited to annotation. Moreover, it facilitates desktop screen recording, making it ideal for power users seeking seamless workflow integration.
3. SnapMotion
The final app on this list is a bit distinct from your standard screenshot tool. It allows you to capture screenshots from a video, which is particularly useful for those who need to do so regularly. With SnapMotion, there’s no need to play a video and align your tool correctly. Just play the video with SnapMotion and click a button to take a screenshot. It’s that simple. You can even automatically capture screenshots by specifying the number of frames. Overall, this is an excellent tool for capturing screenshots from videos.
Capture a Screenshot on Mac with These Methods
Those were all the methods for capturing screenshots on a Mac. I believe most of you will find the macOS screenshot tool and the new Apple screenshot app sufficient for your everyday needs. We’ve also discussed methods to change the screenshot destination on Mac, alter the screenshot format, and recommended some great third-party tools for taking macOS screenshots. If you encounter any issues, please let us know in the comments below. Also, feel free to suggest any third-party apps you think should be mentioned for taking screenshots in macOS Mojave.

Pritam Chopra is a seasoned IT professional and a passionate blogger hailing from the dynamic realm of technology. With an insatiable curiosity for all things tech-related, Pritam has dedicated himself to exploring and unraveling the intricacies of the digital world.