Google’s Gmail, the most used email service globally, boasts simplicity, an appealing interface, and a plethora of extensions enhancing its functionality. But there’s more than meets the eye. Discover 12 cool Gmail tricks you might not be aware of.
Cool Gmail Tricks for 2019
1. Enable Preview Pane
Preview pane, a beloved feature in Outlook, is also available in Gmail. It adds an extra pane to your Inbox, allowing you to view emails directly within it. This feature is particularly useful because it eliminates the need to constantly open and close emails when browsing through multiple messages.
To activate the Preview Pane in Gmail, simply access the Gmail settings by clicking on the settings cog icon in the top right corner and selecting ‘Settings’ from the drop-down menu.
In the Settings menu, go to the ‘Advanced’ tab and scroll down to find the ‘Preview Pane’ option. Enable it and save your changes.
After reloading Gmail, a new icon appears next to the Settings icon. Clicking on it reveals a dropdown menu where you can select either ‘Vertical Split’ or ‘Horizontal Split’ for the Preview Pane.
Personally, I favor the Vertical Split view, but the Horizontal Split view is also available. Opting for the Vertical Split view displays more emails in your inbox, while the Horizontal Split view reduces the number of visible emails as the Preview Pane takes up more space.
Default implementation of this feature in Gmail would be ideal. Until then, it remains one of my favorite Gmail tricks.
2. Utilize Different Colored Stars
While you’re likely familiar with Gmail’s ability to star emails, you may not be aware that there are more options beyond the yellow star. To access additional stars, navigate to Gmail Settings. In the “General” tab, locate the “Stars” section, where you can drag and drop different stars into the “In Use” section to activate them. Once finished, simply click the “Save Changes” button.
Now, you can click on the star icon next to emails multiple times to get different stars. You can use colored stars to mark emails as urgent, important, or completed. For example, red for urgent, yellow for important, and green for completed emails you still want in the “Starred” section.
3. Set Send Cancellation Period for Sent Mails
If you’re prone to typos, Gmail’s undo send feature is a lifesaver. This option lets you retract a sent email within a customizable timeframe. Did you know you can tailor the cancellation period to suit your preferences?
To set the cancellation period for sent mails, go to Gmail settings and find the ‘Undo Send’ option in the General Tab. This option lets you set a send cancellation period from 5 to 30 seconds. By default, it’s set to 5 seconds, but for added security, I suggest setting it to 30 seconds for more time to undo sent emails.
4. Generate Disposable Email Aliases for Sign Ups
Setting up email aliases for various services and websites is common, but there’s a simpler method to create disposable email addresses and route sign-up emails to spam. If your email is “example@gmail.com”, you can use “example+website@gmail.com” as a disposable address. Gmail ignores anything after “+”, so emails sent to example+website@gmail.com will go to example@gmail.test.
After signing up for a service you don’t want emails from, you can establish a filter to automatically archive emails sent to the disposable address.
To access the Gmail search bar, simply hit the dropdown button. In the advanced search page, input the example+website@gmail.com address in the “To” section and then select the “Create filter” option.
In the subsequent page, opt to “Skip the Inbox (Archive it)” or “Delete it” and click “Create filter”. From now on, any emails received on the disposable address will be automatically deleted or archived.
5. Utilize Confidential Mode for Encrypted Emails
With last year’s redesign, Gmail introduced Confidential Mode, enabling encrypted emails to safeguard sensitive information. To utilize this feature, simply tap the ‘Compose’ button and click the new lock with a clock icon in the toolbar to access Confidential Mode.
In the ensuing menu, set an expiration date and opt for requiring a passcode for email access. You can select an expiration date ranging from a day to 5 years, determining when the email will auto-delete from the recipient’s inbox.
For the passcode requirement, select the SMS passcode option and enter the recipient’s phone number. The recipient will receive the passcode automatically when they try to open the mail. Once you’ve set all the details and saved them, you can type out your email as usual and send it.
Using the Confidential Mode encrypts your email and prevents the recipient from forwarding, copying, downloading, or printing the contents. If privacy concerns you, this is one of Gmail’s best tricks.
6. Set Up Canned Responses
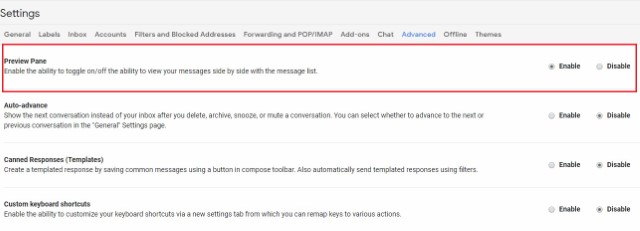
Gmail offers Canned Responses (templates) to streamline repetitive email replies. To set up, go to Gmail settings, select the ‘Advanced’ tab, and enable ‘Canned Responses (Templates)’. Save changes. Now, compose your response, then click the menu button next to the trash icon and select ‘Canned responses’.
To create a new canned response, select ‘New canned response’ from the menu, enter a title for it in the pop-up window, and hit ‘OK’. This action will establish a canned response for replying to emails.
To utilize existing canned responses, click the compose button, then the menu button located to the right of the trash icon. From the pop-up menu, go to ‘Canned responses’ and choose the recently created canned response. You can also remove old canned responses from this menu.
7. Setting up Mail Delegation
Not many people are aware of Gmail’s Mail Delegation feature, which is a shame because it’s incredibly handy. This feature allows you to grant access to your Gmail account to multiple people without sharing your password or other sensitive details. Delegates have limited access to your account; they can send or reply to emails on your behalf, read your emails, delete emails, and manage contacts. However, they cannot change your Gmail password, alter account settings, or engage in chat conversations.
To add a delegate, navigate to Gmail Settings, then to the “Account and Import” tab. In the “Grant access to your account” section, click on “Add another account“.
First, enter the email address of the person you want to add as delegate. Once entered, click on “Next Step”.
Then, select “Send email to grant access”. An email will be sent to the recipient for them to accept the invitation. After acceptance, it may take a few hours for the delegate to access your account.
Note: Gmail users can add up to 10 delegates. Google apps Gmail accounts allow up to 25 delegates from the same organization. Some companies may disable this feature.
8. Track Emails and Check Who’s Tracking You
At times, you send an important email but worry if it’s been read or marked as spam. No need to fret any longer, as there are Gmail extensions for tracking emails, providing read receipts.
To monitor sent emails effortlessly, try the Mailtrack extension, enabling unlimited email tracking in its free version. Simply install it, grant permissions, and it operates automatically. Enjoy the convenience of checkmark icons indicating read status, along with notifications. However, Mailtrack lacks the option to disable tracking for specific emails.
9. Shift Chats Right
The typical Gmail inbox interface can appear busy, especially the left side, which might be overwhelming. It contains various labels and chats below. However, you can relocate the chats to the right side, creating a cleaner look.
To accomplish this, navigate to Gmail settings and access the ‘Advanced’ tab. Locate the ‘Right-side chat’ option and activate it. Then, click ‘Save Changes’ to reload Gmail.
Upon reloading, you’ll notice the chat box has shifted to the right side, enhancing the cleanliness of your inbox.
10. Forward Multiple Emails
Gmail, by default, does not allow you to forward multiple emails, despite occasions necessitating such action. Fortunately, there are methods to forward multiple emails in Gmail. Refer to our comprehensive guide on this topic for optimal forwarding strategies.
11. Advanced Gmail Search
Gmail boasts excellent search capabilities, unsurprising given its Google pedigree. Search emails in Gmail by size, date, attachment filenames, read/unread status, sender, and content. For example, input “larger: 5 MB” to find emails over 5 MB. Or use “filename:pdf” to locate PDF attachments.
Utilize the drop-down button in the search bar for advanced options. Filter by sender, email content, attachments, and more. Custom filters can also be created.
12. Receive Notifications for Specific Labels
If you receive numerous emails daily, Gmail notifications on your iPhone/iPad or Android device can be bothersome. However, in the Gmail app, you can tailor notifications to specific labels, enabling you to disable notifications from labels like Promotions, Spam, etc.
On Android, go to the settings menu in the Gmail app and tap the account you want to manage. Then, select ‘Manage labels’ and choose the label you want to adjust. Tap the checkbox next to ‘Label notifications’ to enable or disable notifications for that label.
For iOS, you can opt for notifications for ‘All New Mail’, ‘Primary only’, ‘High priority only’, or ‘None’.
Ready to Try These Gmail Tricks?
Here are 12 Gmail tricks to enhance your email experience on the Google platform. Try them out and share which ones you found helpful. If you know any other cool Gmail tricks, please share them in the comments below!

Pritam Chopra is a seasoned IT professional and a passionate blogger hailing from the dynamic realm of technology. With an insatiable curiosity for all things tech-related, Pritam has dedicated himself to exploring and unraveling the intricacies of the digital world.

