
Hidden features, often dubbed as “Easter Eggs,” bring joy akin to unwrapping presents from your device. Though seemingly gimmicky, these features harbor immense productivity potential.
The Terminal application in your Mac serves as a portal to the system’s internal workings. Mastering it unveils a plethora of settings adjustments and feature accesses. In this article, I’ll unveil some command line gems enabling you to tap into the multitude of hidden capabilities your Mac holds.
Note: Certain changes may necessitate a system restart or at least a log out and log in, particularly those involving default value modifications.
1. Create Disk Image From Folder Contents
Disk images serve a crucial purpose: preserving files in a restorable format, akin to TimeMachine. To create one from a folder, use:
hdiutil create -volname "VolumeName" -srcfolder /path/to/folder -ov diskimage.dmg
For instance, to create an image from a folder named Beebom:
hdiutil create -volname "BeebomImage" -srcfolder ~/Beebom -ov Beebom.dmg
2. Burn Images to DVD
If your Mac includes a DVD drive, or you use an external DVD RW drive, burning images to DVD is straightforward:
hdiutl burn /path/to/image
To burn the Beebom.dmg image on a DVD, execute:
hdiutil burn ~/Beebom.dmg
Note: This command supports .dmg, .iso, and .img files.
3. Write Disk Image to Volume
You can write a disk image’s data to a volume. First, format the volume. Use:
sudo asr -restore -noverify -source /path/to/image -target /Volumes/volumeName –erase
To demonstrate, create a blank ExFAT-formatted image for restoring Beebom.dmg data:
hdiutil create -megabytes 30 -type UDIF -fs ExFAT ~/BlankDisk.dmg
This created a mountable disk that I could format without losing data. Remember to mount it by double-clicking on it. Then, navigate to “/Volumes/”:
1. Open Finder
2. Press Command + Shift + G
3. Type /Volumes/ and press Enter
Next, I ran this command to write Beebom.dmg contents to BlankDisk.dmg volume:
sudo asr -restore -noverify -source ~/Beebom.dmg -target /Volumes/Untitled/ –erase
4. Convert Files To HTML
If you have a .txt, .rtf, or .doc/.docx file, you can convert it to HTML using a Terminal command:
textutil -convert html file.ext
To add a Recent Apps stack to your Dock, simply replace the “file.ext” with the path to the file you want to convert and press Enter.
I’ve prepared a sample beebom.rtf file for conversion into its HTML equivalent.
Use the command below to convert documents:
Note: This command supports various formats including txt, rtf, rtfd, html, doc, docx, odt, or webarchive.
5. Recent Apps Stack for Dock
The Dock grants swift access to multiple apps, Downloads, and Trash. Yet, a straightforward command can add another stack to the Dock for Recent Applications. Though the command might seem lengthy, it’s easily executed.
Execute the command:
defaults write com.apple.dock persistent-others -array-add \
'< "tile-data" = < "list-type" = 1; >; "tile-type" = "recents-tile"; >' && \
killall Dock
This enables the “Recent Applications” stack on your dock. Perform a “double-finger tap” on this stack to choose from options such as “Recent Applications”, “Recent Documents”, “Recent Servers”, etc.
6. Add a Spacer Tile to Dock
Add a blank tile, or spacer tile, to the dock. This can increase the space between icons to give them a more spread out and neat look, if desired. The command to add a spacer tile to your dock is similar to adding a “Recent Apps” stack.
defaults write com.apple.dock persistent-apps -array-add ” && \
killall Dock
7. Prevent App Icons on Dock From Bouncing
An app icon bouncing on the dock annoys me. Though it only happens when attention is needed, it’s really bothersome. To stop this, use the command below:
Note: This command doesn’t stop bouncing when launching, only when attracting attention.
defaults write com.apple.dock no-bouncing -bool false && \
killall Dock
If you miss bouncing icons or want to try it, use this command to enable bouncing again:
defaults write com.apple.dock no-bouncing -bool true && \
killall Dock
8. Reset Dock
If your Dock is cluttered with too many applications, resized icons, or rearranged icons excessively, you might crave its original simplicity. Resetting it is effortless.
To restore your Dock to its default settings, simply execute this command in Terminal:
defaults delete com.apple.dock && \
killall Dock
Hide Files or Folders
Hiding files or folders serves various purposes, such as safeguarding confidential data from prying eyes.
Files with a “.” prepended to their name are hidden by default. However, simply prepending a “.” to a file or folder won’t work. Finder will give you a warning, and the operation will fail.
If someone wants to check for hidden folders in your directory, they will likely look for files with a “.” prepended to their names. So why not hide your personal files and folders more effectively?
All it takes is a simple command:
chflags hidden /path/to/file/folder
To unhide these files or folders, replace “hidden” with “nohidden” in the command above.
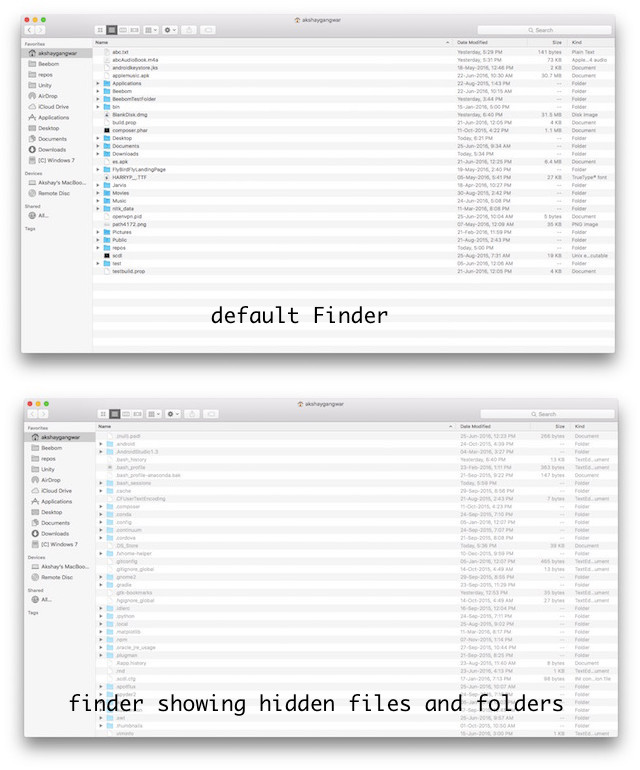
10. Show/Hide Hidden Files and Folders
Some directories and files on your Mac remain hidden in Finder. These files and folders aren’t typically needed by casual users. However, accessing them is possible by adjusting a default Finder value with the command:
defaults write com.apple.finder AppleShowAllFiles true
Conversely, to hide these files and folders again, change “true” to “false” in the command.
- Find the “Finder” icon on your Dock.
- Press “option” and click with two fingers on the icon.
- Choose “Relaunch” from the context menu.
11. Revealing Full Path in Finder Title Bar
If you’ve utilized Terminal for file management, you understand the significance of locating file paths to guide Terminal accurately.
Typically, you’d select a file in Finder and access the “Get Info” option to discover its path. Yet, you can configure Finder to display the entire path of your current directory with a single command.
Use the command below:
defaults write com.apple.finder _FXShowPosixPathInTitle -bool true
Your Finder will now exhibit the complete path to the current directory in its title bar.
To disable this feature, employ the following command:
defaults write com.apple.finder _FXShowPosixPathInTitle -bool false
12. Enabling Option to Quit Finder
Finder, an app devoid of a “Quit Finder” option in its menu and unresponsive to “Command + Q” shortcuts, appears invincible. Yet, the ability to quit Finder lies concealed, awaiting exposure through a simple command.
To rehide the option, execute the following command:
defaults write com.apple.finder QuitMenuItem -bool false && \
killall Finder
13. Smooth Scrolling Disabling
While smooth scrolling enhances UI fluidity and user interaction, on older Macs, it can detract rather than add to the experience.
Older Macs might lack sufficient GPU power for smooth scrolling effects on the UI. Fortunately, smooth scrolling can be disabled.
This command disables smooth scrolling on your Mac.
To re-enable it, replace “false” with “true.”
14. Show/Hide Desktop Icons

Ever screen-shared via apps like “FaceTime” or “TeamViewer”? Most have tried one of these services at least once. But if you’re like me, your desktop often gets cluttered, and naturally, you wouldn’t want others to see it. Especially if that person happens to be your boss; you wouldn’t want them to witness your disorganization, right?
Instead of spending time filtering and sorting files, use this command to hide desktop icons. It’s perfect for screen sharing, presentations, or any task where someone might judge your organizational skills based on your desktop.
The command to hide icons is:
Use this command to tidy up your desktop:
defaults write com.apple.finder CreateDesktop -bool false && \
killall Finder
Once finished, restore your desktop:
defaults write com.apple.finder CreateDesktop -bool true && \
killall Finder
15. Optimize Finder: Show/Hide Path Bar
The path bar simplifies navigation by displaying the current directory’s path. Rather than cluttering your screen with the title bar, utilize the path bar for its intended purpose.
Enable the path bar in Finder with:
defaults write com.apple.finder ShowPathbar -bool true
To open folders, files, URLs, or applications, use the Terminal app.
The command is simply “open”. The arguments you provide help it decide what to open.
For instance, to open a folder:
If you’re already in a directory in the Terminal and want to open it in Finder:
Note: Use a “.” after “open” to open the current folder.
You can also open URLs.
17. Prevent Mac From Sleeping
Many applications prevent your Mac from sleeping for a specified period. Why install a third-party app when Terminal achieves the same?
A built-in command line utility, “caffeinate”, cleverly named for its sleep-preventing qualities, serves this purpose.
The command is simple:
caffeinate -u -t time_in_seconds
For instance, to prevent sleep for 1 hour:
caffeinate -u -t 3600
18. Adjust Display Sleep Time
If you prefer, customize your Mac to put the display to sleep after your specified duration.
Utilize the “Power Manager” for this task. However, executing the command requires “super user” access, as it alters power settings.
sudo pmset displaysleep time_in_minutes
For instance, to have your Mac sleep after 5 minutes of inactivity, input:
sudo pmset displaysleep 5
19. Enable Automatic Restart for Frozen Mac
Macs are efficient machines, rarely freezing due to OS X’s resource management prioritizing the user. However, occasionally, even Macs become unresponsive. At such times, holding down the power button until it powers off and then restarting is the only option.
Wouldn’t it be better to automatically restart your Mac when it freezes? I believe so.
Simply run sudo systemsetup -setrestartfreeze on, and your Mac will restart if it freezes. Neat, right?
Note: I couldn’t test this as I wasn’t going to intentionally freeze my Mac, but the documentation includes this feature, so it should function.
20. Disabling Autocorrect Feature on Your Keyboard
Autocorrect can be a lifesaver or a nuisance. Opinions on it vary widely. If autocorrect is more helpful than bothersome for you, great! Mac keyboards have it enabled by default. However, if you’re like me and find it more of a hindrance, you can easily disable it with a simple command:
defaults write -g NSAutomaticSpellingCorrectionEnabled -bool false
21. Disabling Default Long Press Actions for Keys
At times, we all feel the urge to type messages with unnecessary repeated letters like “hiiiiiiii” or “yayyyy”. Admit it, you’ve done it too. The issue lies in the Mac keyboard mimicking the behavior of a mobile device. When a key is long-pressed, it brings up a menu for accented characters. While some may find this feature useful, I consider it unnecessary. Long-pressing on an iPhone produces accented characters, but should the same apply to a laptop? I doubt it.
Fortunately, there’s a solution to prevent this iOS-like behavior from infiltrating our Macs.
Execute the following command:
defaults write -g ApplePressAndHoldEnabled -bool false
It’s advisable to log out and log back in for the changes to take effect.
22. Adjust Key Repeat Rate
Changed the default long press behaviour for your Mac, and tried to repeat letters by long pressing on the key, but it’s too slow (or maybe, too fast)? Adjust the key repeat rate. Set the value to your preference, you’ll have to test out a couple of values to find a good match.
defaults write NSGlobalDomain KeyRepeat -int 0.02
This will set a very fast key repeat rate. You can adjust the value to your preference.
23. Convert Audio File to iPhone Ringtone
iPhones use the .m4r format for ringtones, and if you have ever wanted to set your favorite song as your ringtone, you’re out of luck until you convert the file to the .m4r format. Fortunately, you can do this very easily using the Terminal.
afconvert input.mp3 ringtone.m4r -f m4af
This command converts an input.mp3 file to .m4r format, saving it as “ringtone.m4r”.
24. Convert Text File to Audiobook
With a simple Terminal command, transform any text file into an Audiobook, complete with appropriate pauses at punctuation.
The command: say -v Alex -f /path/to/file.txt -o "outputfile.m4a"
Note: Utilizing the “Alex” voice, this command generates the audiobook. OS X provides numerous voices; explore them by executing say -v ? in the Terminal.
25. Mute Sound during Boot
Pressing a key during computer startup can silence the iconic “chime,” but it requires repeating the action each time. Why not disable it entirely? Run this command:
sudo nvram SystemAudioVolume=” “
26. Display WiFi Network Password
Often, my Mac is connected to WiFi while I need to connect my phone, but I forget the password. Instead of guessing, I find it more efficient to ask my Mac directly:
security find-generic-password -D “AirPort network password” -a “SSID” -gw
Here’s the command for your Terminal: Replace “SSID” with your WiFi network name.
Note: This command reveals passwords of previously connected WiFi networks on your Mac, not for cracking.
27. Generate Secure Passwords
Creating and recalling secure passwords is challenging. I can assist with the creation part; remembering is up to you. Consider noting it down securely.
Use Terminal to generate robust passwords with this command:
28. Take Delayed Screenshots
Ever wanted to capture a delayed screenshot? Personally, I haven’t needed to, but maybe you have. There must be users for this since third-party apps exist for it. Perhaps some want to create screen time-lapses, but that’s beside the point. You don’t need those apps. All you need is the Terminal and this command:
screencapture -T 3 -t jpg -P delayedpic.jpg
This command captures a screenshot after 3 seconds and saves it as “delayedpic.jpg” on your computer.
29. Changing the Default Screenshot Format
Here at Beebom, we exclusively use JPEG screenshots on our website; whereas Macs capture screenshots in PNG format by default. This posed a significant challenge: I had to convert every screenshot to JPEG before utilizing it on the site. However, this predicament spurred me to seek a solution, and it turns out, a simple command provides the answer.
defaults write com.apple.screencapture type “jpg”
This command will save me numerous hours spent converting screenshots to JPEGs and then uploading them.
30. Enable iOS Charging Sound When MagSafe Connects
Honestly, it’s more of a gimmick, but it could be useful if the light on your MagSafe connector has gone bad. Note that I said “could” be useful. You can still see the battery icon to check if your laptop is charging or not. But, this is a cool hidden feature, nonetheless, and I’m covering it.
defaults write com.apple.PowerChime ChimeOnAllHardware -bool true && \
open /System/Library/CoreServices/PowerChime.app
You can turn it off, too.
defaults write com.apple.PowerChime ChimeOnAllHardware -bool false && \
open /System/Library/CoreServices/PowerChime.app
Explore, Learn, Be Productive
These hidden features aren’t exhaustive. I don’t claim to know everything the Terminal can do, but this article can give you some idea about exploring the Terminal and its commands. Try the features I’ve explained, and comment below, sharing your experience.

Pritam Chopra is a seasoned IT professional and a passionate blogger hailing from the dynamic realm of technology. With an insatiable curiosity for all things tech-related, Pritam has dedicated himself to exploring and unraveling the intricacies of the digital world.