As the tech world shifts its focus to the cloud, Microsoft bolstered this trend with OneDrive (formerly SkyDrive). Integrating it with Microsoft Office, the company introduced Upload Center. This feature accompanies Office editions from 2010 onwards. When using Office while logged in with a Microsoft account, files are automatically saved locally and uploaded to OneDrive. While Microsoft promotes this as useful, many users see it as a privacy breach. Upload Center is enabled by default with no option to disable it. However, there are workarounds. If you seek to disable it, here are some methods:
Note: I tested these methods on my computer running Windows 10 Pro and Microsoft Office Professional Plus 2016. They should also work for other Windows versions such as Windows 8.1, 8, 7, as well as with Office 2010 or higher.
Remove Office Upload Center Using Registry Editor
- Open Run command by pressing Windows + R on your keyboard. Here, type “regedit” and then hit enter to open the Registry Editor.
- If you have the Address Bar enabled, you can copy and paste the path below; if not, you’ll have to navigate there manually.
HKEY_CURRENT_USER\Software\Microsoft\Windows\CurrentVersion\Run
- Right-click on this and click “Delete”.
- When the “Confirm Value Delete” window appears, select “Yes”.
Next time you restart your computer, Microsoft Office Upload Center should be removed.
Disable Office Upload Center by Changing Its File Name
This method involves renaming the executable file of Microsoft Office Upload Center. By doing this, Windows won’t find the file it needs to open Upload Center. Follow the steps below:
- Open File Explorer on your computer by pressing Windows + E. Either type the following path in the address bar or navigate there manually:
C:\Program Files\Microsoft Office\Office16
- Look for a file named “MSOSYNC”. Rename it to anything you prefer. I chose “MSOSYNC-old”.
This method prevents Upload Center from opening as Windows cannot find a file named “MSOSYNC,” necessary to open the application. If you encounter any error messages or wish to re-enable Upload Center, simply rename the file back to “MSOSYNC,” and you’re ready to proceed.
Disabling Microsoft Upload Center Using Task Scheduler
- Launch the Run command by pressing Windows + R on your keyboard. Then, type “taskschd.msc” and click “OK” to open Task Scheduler.
- In the left pane, select “Task Scheduler Library”.
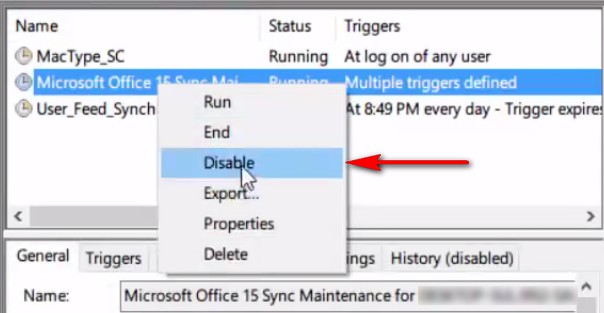
- Locate the task labeled “Microsoft Office 15 Sync Maintenance for “ in the middle pane.
- Right-click on this task and click “Disable”.
This disables the task scheduling of Microsoft Office Upload Center. After rebooting your computer, the application won’t run.
Bonus: Hide Office Upload Center From Notification Area
This method doesn’t stop the service but hides it from the notification area of your computer. If this suits your needs, follow the steps below:
- Open the Start menu and type “Upload Center”, then click to open it.
- In the Upload Center window, click “Settings”.
- Under “Display Options”, uncheck “Display icon in notification area”.
Removing the Microsoft Office Upload Center icon from your computer’s notification tray won’t hinder the application’s background functionality.
Deactivate Microsoft Office Upload Center on Windows
While cloud file uploads offer convenience, some providers compromise privacy. Unless using OneDrive for Business, your data lacks encryption at rest, exposing it to potential access by Microsoft. Disabling Microsoft Office Upload Center empowers privacy protection. Which method did you choose? Share in the comments below.

Pritam Chopra is a seasoned IT professional and a passionate blogger hailing from the dynamic realm of technology. With an insatiable curiosity for all things tech-related, Pritam has dedicated himself to exploring and unraveling the intricacies of the digital world.


