Ever pondered why your mailbox fills with emails from forgotten websites? If so, you’re not alone in battling classic email spam. How can we combat this and evade phishing attempts effectively? Apple presents a solution with Hide My Email, a new iOS 15 feature. Discover how to use it on your iPhone and iPad.
Utilizing Hide My Email in iOS 15 on iPhone and iPad (2021)
Let’s delve into how this security feature operates and then explore enabling and leveraging Hide My Email on your devices.
Hide My Email: Simplifying Privacy in iOS 15
What is Hide My Email and How It Works in iOS 15?
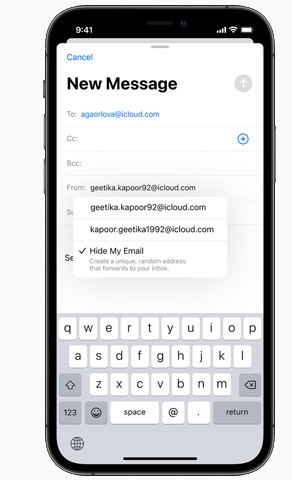
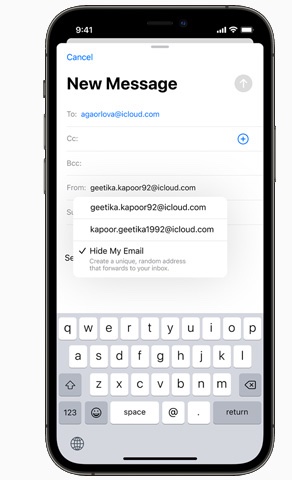
Unveiled within the new iCloud+ subscription, “Hide My Email” acts as a shield, safeguarding your real email address from apps and websites. Essentially, it provides a unique, random email address that forwards messages to your inbox, ensuring your personal email remains concealed. In essence, Hide My Email enables services to reach you without disclosing your actual email address.
When signing up on a website or composing an email, opt for the Hide My Email or Continue with Apple feature to proceed without sharing your email ID. Entrust Apple to manage the security of your personal email, shielding it from spam and phishing attempts.
Where Can You Use Hide My Email?
Receiving Emails from Apps/Websites via Hide My Email Address
Apple ensures fair play behind the scenes. Any address generated using Hide My Email forwards emails to the primary address seamlessly, minimizing delays.
But what about sensitive information shared by websites? Apple affirms it neither sees nor stores personal data. It merely allows you to create random addresses and forwards emails to your chosen one, maintaining privacy.
Managing Apps Using Hide My Email Address with Apple
To ensure control over who contacts you, Apple allows managing apps that use Hide My Email. You can completely stop an app from using the generated email address and choose to prevent it from forwarding any email. Additionally, you can change the forwarding email address at will.
Can You Use Hide My Email for Free Without Upgrading to iCloud+?
Absolutely! Apple lets you use Hide My Email for free. However, to unlock all features, including creating random addresses and hiding your email while sending emails, you’ll need to upgrade to iCloud+. Subscriptions start at $0.99/month.
For the uninitiated, Hide My Email is an extended version of Sign in with Apple introduced alongside iOS 13 a couple of years ago. It allows you to conceal your email address during service sign-up on your iPhone.
In iCloud+, Hide My Email presents two distinctive features. Firstly, you can generate random email addresses at any time without requiring a sign-up page. These can be sent via any messaging service and utilized for registration on your PC. Additionally, the new email addresses end with “@iCloud.com,” making them simpler to recall. Therefore, signing up for new services with Hide My Email in iCloud+ is more convenient.
Free Hide My Email lets you track all connected apps to your Apple ID without cost. However, it’s cumbersome, requiring a visit to your Apple account on the web. iCloud+ simplifies this by consolidating all features within iOS 15 settings.
Create Hide My Email Address in iOS 15 on iPhone and iPad
- Launch the Settings app on your iPhone or iPad.
2. Tap your profile avatar at the top.
3. Select iCloud.
4. Choose “Hide My Email”.
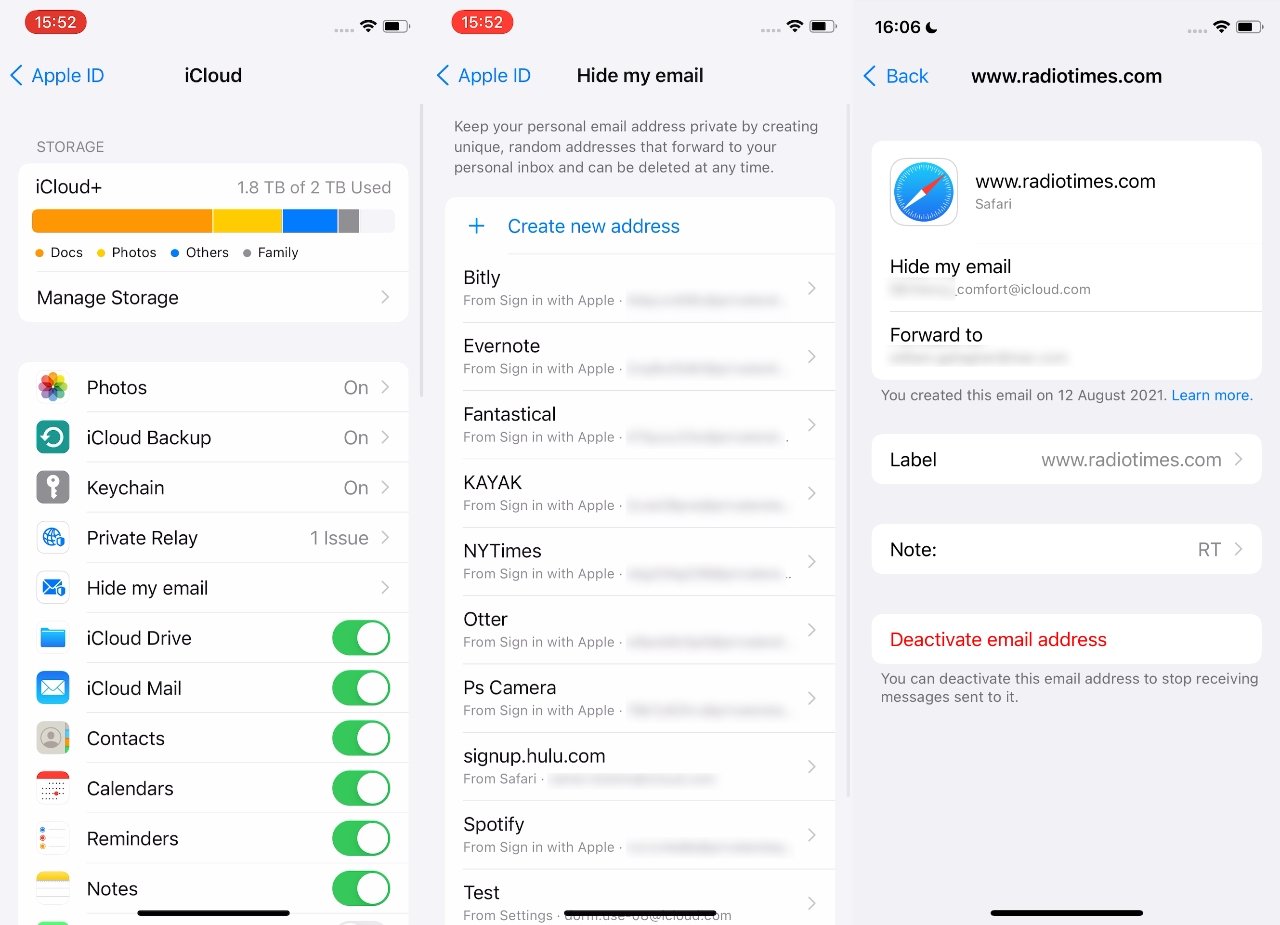
5. Tap “Create new address”.
6. Tap Continue.
7. Label your address. It helps you remember the app for which you used this email address. Additionally, you can add a note to recall its usage.
8. Upon completion, you’ll receive a confirmation: “All Set. Your unique, random address has been created.” Tap “Done” to finish.
Explore Apps Using Hide My Email Address
iOS 15 enables tracking of all apps signed up for using Hide My Email addresses. Follow these steps:
- Open Settings on your iPhone or iPad, then navigate to profile photo -> iCloud -> Hide My Email.
2. Following is the list of apps and websites using Hide My Email. Tap an entry to view its associated email address.
Disabling Forwarding from a Hide My Email Address in iOS 15
- To disable forwarding, go to Settings -> profile picture -> iCloud -> Hide My Email on iOS 15.
2. Choose the app or website from which you no longer wish to receive emails.
3. Disable the “Forward to” switch, then confirm by tapping “Turn off” in the prompt.
Changing Hide My Email Forwarding Address on iPhone and iPad
iOS 15 enables you to change your Hide My Email forwarding address easily on iPhone and iPad.
- To hide your email on iPhone or iPad, go to Settings -> profile picture -> iCloud -> Hide My Email.
- Next, tap “Forward to”.
- Now, choose the email address for forwarding.
Prevent Apps from Accessing Your Apple ID on iOS Devices
- In the Settings app on iOS 15 or iPadOS 15, tap your profile.
2. Tap Password & Security.
3. Then, tap Apps using Apple ID under “Sign In With Apple”.
4. Now, pick the app no longer needing your Apple ID.
6. Tap “Stop using Apple ID” and confirm by tapping “Stop Using” in the pop-up.
Maximizing ‘Hide My Email’ to Combat Unwanted Emails
In an era of persistent hacking and malware threats, prioritizing additional safeguards is essential. Hide My Email can significantly contribute to shielding your personal email from spammers. To fully utilize this security feature on your iOS 15 iPhone, upgrading to iCloud+ is necessary. What’s your opinion on Hide My Email in iCloud+? Share your thoughts in the comments below. Also, discuss other notable iOS 15 features such as Notification Summary, Focus mode, Safari extensions, and Apple Digital Legacy.

Pritam Chopra is a seasoned IT professional and a passionate blogger hailing from the dynamic realm of technology. With an insatiable curiosity for all things tech-related, Pritam has dedicated himself to exploring and unraveling the intricacies of the digital world.

