Remote desktop, facilitated by the Remote Desktop Protocol (RDP), allows seamless access to files and applications from a distance. This functionality is invaluable for providing assistance or managing a computer remotely. Below, we outline the process of enabling remote desktop on your Windows 11 device.
Enabling Remote Desktop in Windows 11
Windows 11 offers various methods for activating remote desktop functionality, accessible through the Settings menu, Control Panel, Command Prompt, and Windows PowerShell. This guide elucidates each method, empowering you to harness remote access capabilities effortlessly.
Steps to Activate Remote Desktop on Windows 11
Before diving into the tutorial, remember: Remote Desktop is exclusive to Windows 11 Pro and Enterprise. Windows 11 Home users can explore third-party options. We suggest TeamViewer or AnyDesk. For a free, straightforward solution, consider Chrome Remote Desktop.
Method 1: Enabling Remote Desktop in Windows 11 Via Settings
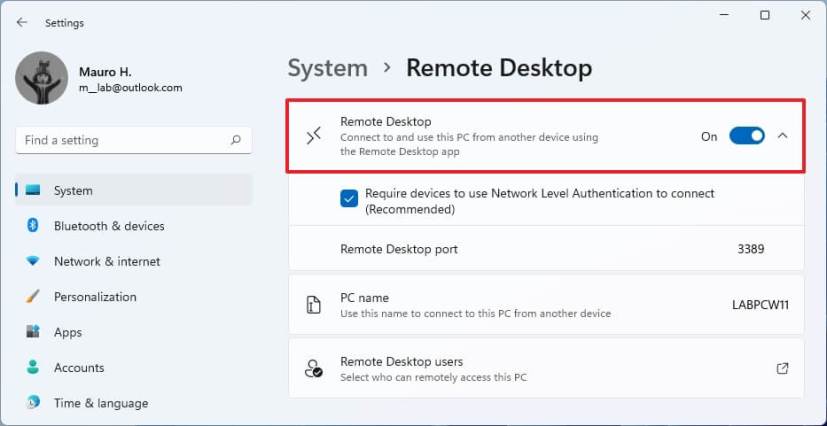
- Access Settings (Win + I shortcut), click “System” on the sidebar, then choose “Remote Desktop” on the right.
- Turn on “Remote Desktop” and click “Confirm” to apply.
That’s it. You can now connect to your computer using either the Remote Desktop app (Free) or the Remote Desktop Connection wizard.
Method 2: Enable Remote Desktop in Windows 11 Via Control Panel
- Open Control Panel on your Windows 11 PC. To do that, search for “control panel” (without quotes) in the Windows search bar and select “Control Panel” from the results.
- In the Control Panel, ensure you are in the “Category” view and select the “System and Security” option.
- On the next page, click “Allow remote access” under System. You will now see a pop-up window with options to connect to a remote desktop.
- To enable Remote Desktop on Windows 11:
- In System Properties, select “Allow remote connections to this computer”, and check the box for “Allow connections only from computers running Remote Desktop with Network Level Authentication”. Click “OK” to save.
- Open Command Prompt as Administrator by searching for “cmd” in the Windows search bar and choosing Run as Administrator.
These actions activate Remote Desktop on your Windows 11 PC, simplifying remote access.
- To enable remote desktop on your Windows 11 computer, simply copy and paste the command below into the Command Prompt window: reg add “HKEY_LOCAL_MACHINE\SYSTEM\CurrentControlSet\Control\Terminal Server” /v fDenyTSConnections /t REG_DWORD /d 0 /f. Then, press Enter.
- Additionally, consider executing the following command to allow remote desktop through the Windows Firewall: netsh advfirewall firewall set rule group=”remote desktop” new enable=Yes.
Once executed without errors, you can utilize the Remote Desktop app to remotely access other client devices.
Method 4: Enable Remote Desktop in Windows 11 Via PowerShell
- To open Windows PowerShell in Admin mode on your PC, search for “powershell” in the Windows search bar and click Run as Administrator.
- In the PowerShell window, paste the following command and press Enter: Set-ItemProperty -Path ‘HKLM:\System\CurrentControlSet\Control\Terminal Server’ -name “fDenyTSConnections” -value 0
- Ensure the Windows Firewall doesn’t block your remote desktop connection by executing this command: Enable-NetFirewallRule -DisplayGroup “Remote Desktop”
That’s it. You have now successfully activated remote desktop on your Windows 11 PC via PowerShell. You can now access remote computers for support or access your work files from home.
Effortlessly Access Windows 11 PCs Remotely!
Enabling remote desktop in Windows 11 is simple. Empower your PC to provide technical support or access files while you’re away. Also, explore remote control options for Android devices and top apps for managing Windows from your Android or iPhone.

Pritam Chopra is a seasoned IT professional and a passionate blogger hailing from the dynamic realm of technology. With an insatiable curiosity for all things tech-related, Pritam has dedicated himself to exploring and unraveling the intricacies of the digital world.

