
Whether you’re demonstrating a feature in macOS Ventura or sharing amusing clips, screen recording offers a straightforward solution. macOS boasts built-in screen recording, continually refined by Apple across operating system updates. Here’s how to screen record effortlessly on your MacBook or iMac:
Note: The methods outlined below apply to all macOS versions, including Big Sur, Monterey, and Ventura.
We’ll discuss ways to record your Mac screen, starting with native methods and third-party apps. You can use the table of contents to navigate.
Recording Screen on a Mac
There are two methods to start screen recording on your Mac, both leading to the same tool.
Using Screenshot and Recording Toolbar (command + shift + 5)
- Press command + shift + 5 to open the screenshot toolbar.
- Select the screen recording option. You can choose to record the entire screen or a part of it using the options highlighted.
- Once you’ve made your choice, simply click ‘Record’ to start recording the screen.
Using QuickTime Player to Screen Record on Mac
- Open the QuickTime Player app and click ‘File’ in the menu bar.
- Here, click ‘New Screen Recording’.
- You will see the screenshot toolbar on your screen, which you can use to record the screen in macOS easily.
Stopping Screen Recording
If you’ve started recording your Mac screen, it’s essential to know how to stop it. Here’s what you need to do:
- Look for the recording icon on your Mac menu bar. Click on it to stop the recording.
Recording Screen with Audio on Mac
System Audio Recording
- Get “Loopback” (free download) and install it.
- Launch Loopback and click on ‘New Virtual Device‘.
- Click the ‘plus’ icon next to ‘sources’ and choose the app for audio recording. For instance, I’m using Microsoft Edge.
- You can rename the virtual device for easy recall. However, “Loopback Audio” suffices.
- Now, open the screenshot utilities toolbar by pressing command + shift + 5 and select ‘Options’.
- Select ‘Loopback Audio’ (or your virtual device name) as the microphone.
Now, initiate screen recording, capturing the audio output from your chosen app(s) within Loopback.
Record Screen with Mic Audio
- Access the screenshots utilities toolbar via command + shift + 5 and tap ‘Options‘.
- Choose your Mac’s microphone for audio input.
You’re set! Begin screen recording on your Mac, which will also capture audio from its built-in microphone.
Utilize Your iPhone as a Mic for Screen Recording

- Access the screenshot utilities toolbar with command + shift + 5 and tap ‘Options‘.
- Now, opt for your iPhone’s mic as the audio source.
That’s it. Initiating your Mac screen recording will capture audio directly from your iPhone’s mic.
Exploring Mac Screen Recording Features
macOS’s built-in screen recording tool offers various options and tools to enhance your screen captures. Let’s delve into these features to leverage them effectively.
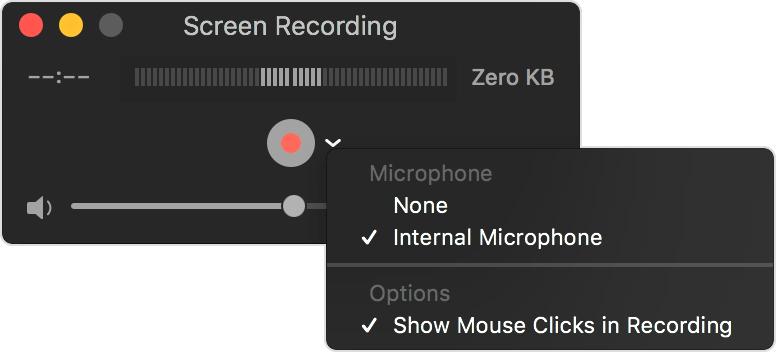
Display or Conceal Mouse Clicks in Screen Recordings
- Access the screenshot utilities toolbar by pressing ‘command + shift + 5‘ and select ‘Options’.
- Activate ‘Show Mouse Clicks‘.
Now, your Mac screen recordings will visually highlight mouse clicks with a black circle appearing around the pointer upon clicking.
Utilize a Timer for Screen Recordings
- Access the screenshot utilities toolbar with ‘command + shift + 5‘ and select ‘Options‘.
- In the ‘Timer’ options, set your desired delay.
Now, when you hit ‘Record’, a countdown will precede the screen capture.
Adjust the Save Location for Screen Recordings
- Access the screenshot utilities toolbar with ‘command + shift + 5‘ and choose ‘Options‘.
- Select your preferred folder for saving screen recordings.
Mute Audio in Screen Recordings
- Open the recorded video in QuickTime Player, then simply click ‘Edit’ in the menu bar.
- Click on ‘Remove Audio’ to delete the audio from the recorded file and save it.
Trim Recorded Videos
Since I must manually press the stop button in the menu bar to end recording my Mac screen, I often record more video than necessary. To be honest, I tend to capture a bit extra at the beginning as well. If you’re in the same situation, you’ll be pleased to learn that you can trim your recorded videos without using a full-fledged video editing app.
- Open the recorded video in QuickTime Player and select ‘Edit’ from the menu bar.
- You will find a timeline beneath the video with start and end markers, as shown in the screenshot below.
- Adjust these to the points where you want the video to start and end, and save the video file.
That’s it, you have successfully trimmed your screen recording. Pretty easy, right?
Best macOS Screen Recording Apps
Though the built-in screen recording utility in macOS Ventura is feature-rich enough for most use-cases, if you’re looking for something more powerful, you will have to check out a third-party screen recording application. There are a lot of apps that you can check out, including paid apps like Camtasia (free trial; $224.99), and free open-source tools like OBS Studio (free). You can check out our detailed list of Mac screen recording apps and choose the one that meets your requirements best.
Well, those are all the ways you can record the screen on your Mac. As you can see, the built-in recording utility in macOS is quite feature-packed and can easily meet the needs of most people. You can screen record on your Mac, add timers, show mouse clicks, and a lot more. What’s more, you now know how to record the screen on your Mac with system audio as well; and obviously, there are a ton of third-party apps to check out for power users. So, are you using the native screen recorder in macOS, or are you opting for a third-party app? Let us know in the comments.

Pritam Chopra is a seasoned IT professional and a passionate blogger hailing from the dynamic realm of technology. With an insatiable curiosity for all things tech-related, Pritam has dedicated himself to exploring and unraveling the intricacies of the digital world.