In January, Tasker unveiled a significant update enabling users to execute core system tasks on Android without requiring root privileges. This innovation simplifies tasks for users hesitant about rooting their devices. This article delves into how Tasker achieves system-level tasks without root privileges, focusing on changing the preferred network type without root permission.
Changing Preferred Network Type with Tasker
- Understanding ADB Permissions
- Granting ADB Permissions (One-time Process)
- Modify Network Type Using Tasker
Streamline Network Adjustments on Android
Demystifying ADB Permissions
Prior to delving into the steps, it’s crucial to understand the fresh ADB permissions you’ll authorize within this guide. The primary permission, WRITE_SECURE_SETTINGS, empowers an application to access secure system settings. Since third-party applications lack this permission, employing ADB becomes necessary to enable Tasker to engage with system settings.
Next, the ADB WiFi permission, a sensitive permission generally discouraged for granting by users. This permission permanently opens a port on your Android device accessible by any other installed app. However, you’ll always receive a security prompt before granting access to that port. Thus, if you receive an unexpected USB Debugging prompt—without manual invocation—cancel it immediately, as malicious apps can exploit this port for device control if permitted.
Now, let’s discuss the purpose of this permission. The command maintains an open port on your device, allowing Tasker to execute ADB shell commands directly on the device. While the wireless ADB feature is typically used for PC-smartphone tethering, Tasker utilizes it internally to execute ADB commands without the need for a PC. This capability enables you to perform tasks on Tasker that previously necessitated root permission.
Summarily, DO NOT approve debugging permission if prompted unexpectedly. Only grant it if you’ve manually invoked the command. To revoke all ADB authorizations, navigate to Settings -> About Phone -> Developer Options -> Revoke USB Debugging Authorization. Additionally, you can disable “Wireless ADB Debugging” to permanently close the port.
Granting ADB Permissions (One-time)
1. Initially, install the Tasker app ($3.49) on your Android device.
2. Then, set up ADB on your computer and connect your Android device. To confirm the connection, execute adb devices in the Terminal/CMD window. If it shows a serial number, you’re set.
3. Run the command below to grant Write Secure Settings permission to Tasker. It alters settings without displaying any output.
adb shell pm grant net.dinglisch.android.taskerm android.permission.WRITE_SECURE_SETTINGS

4. Grant the ADB WiFi Permission. Execute the command below and confirm on your Android device by selecting “Always allow from this computer” and then “Allow”.
adb tcpip 5555
5. Now, disconnect your device from the computer. All necessary permissions have been granted, and further actions can be performed on the Android device.
Modify Preferred Network Type Using Tasker
Now that you’ve learned and granted all necessary permissions, let’s explore a simple example: changing the preferred network type on Android devices using Tasker. You can also manage other functions such as toggling mobile data, Airplane mode, WiFi, and more. However, for this guide, we’ll focus on this straightforward process.
1. Open Tasker, grant initial permissions, then navigate to the “Tasks” section and tap the “+” button. Choose a name; for instance, I’ve named mine “4G”, then tap “Done”.
2. Tap the “+” button again and search for “network”. Select “Mobile Network Type”.
3. Open the drop-down menu and select “4G” or your preferred network type. Return to create a task, adding more operations if desired, such as disabling WiFi alongside 4G activation.
4. For comprehensive guidance, establish another task titled “2G/3G” to enable seamless switching between network types. Follow the previous steps: add a task using the “+” button, search for network settings, and opt for “2G and 3G” from the drop-down menu.
5. Test your tasks by tapping the “Play” button at the bottom-left corner. If the network configuration changes as expected, you’re all set.
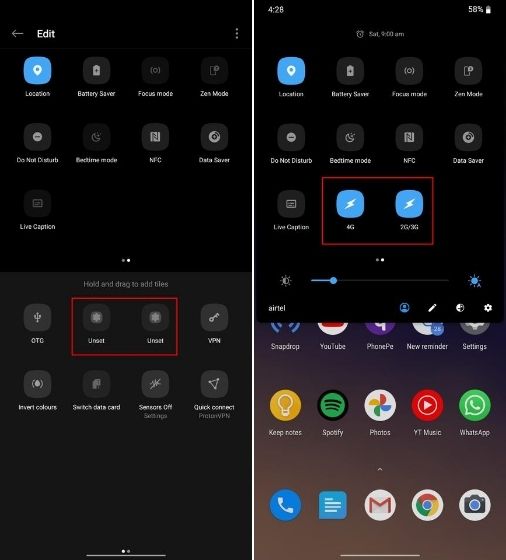
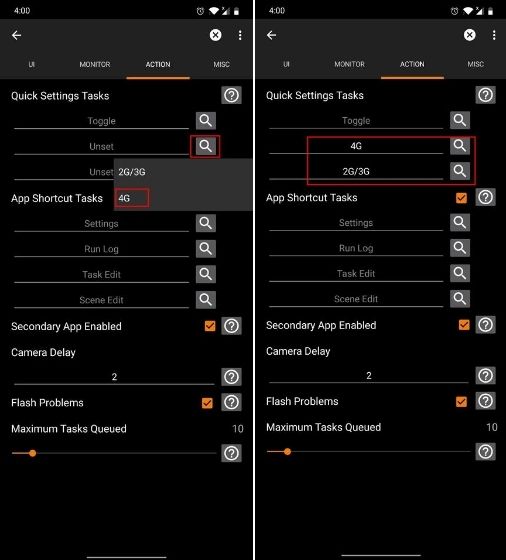
6. Additionally, you can create a profile and automate tasks based on various conditions such as time and home WiFi connection. However, rather than automating the task, you can create a toggle under the Quick Settings menu. Open “Tasker” and navigate to “Preferences“. Here, go to the “Action” tab.
7. Now, under Quick Settings Tasks, tap the “search” button and select the task. Repeat this for the other task.
8. Finally, pull down the Quick Settings panel and tap the edit button. Locate Tasker toggles and add them to the Quick Settings menu. Now you can simply tap the toggle to activate the task and change the network type instantly. Note that both toggles may appear active due to a bug, but you must tap them to activate the task.
Mastering New ADB Permissions and Altering Preferred Network Type via Tasker on Android
That’s the gist of it. Simply enable two ADB permissions, and you can perform myriad operations in Tasker, previously necessitating root access. Just refrain from granting debugging permission to random prompts. Furthermore, you can toggle system settings, control overlays, and manage permissions directly from Tasker, sans root access. That concludes our overview. If you encounter any issues, feel free to comment below, and we’ll endeavor to assist you promptly.

Pritam Chopra is a seasoned IT professional and a passionate blogger hailing from the dynamic realm of technology. With an insatiable curiosity for all things tech-related, Pritam has dedicated himself to exploring and unraveling the intricacies of the digital world.


