The significance of securing external hard drives is self-evident. If you regularly back up your primary machine (which is advisable), chances are you rely on an external hard drive for this purpose. Regardless of your computer’s security measures, the risk remains that someone could simply abscond with your external hard drive and access its data. Even if you don’t use your hard drive for backups, it likely contains files you’d prefer to keep private. Given that hard drives can be accessed from any device, encrypting them is a prudent precaution. Encrypting a hard drive mandates a password for access to its contents. If you’ve yet to secure your external hard drives, here’s how to do so for both Mac and Windows:
Password Protecting External Hard Drive on Mac
Two methods exist to encrypt external hard drives on a Mac, both built into macOS, requiring no additional software. Before proceeding, establish and document a robust password for decryption purposes.
Note: Tested on a MacBook Pro with macOS High Sierra; applicable to macOS Sierra and earlier versions.
Method 1: Using Finder
1. In the Finder window, locate your external drive.
2. Right-click (or control + click) the drive icon and choose “Encrypt (drive name)” from the menu.
3. Open a dialogue box to create a strong password and hint. Enter your password and provide a hint. Even if you can recall the password without the hint, still input something (hint creation is obligatory), if only to mislead.
4. Encrypt your hard drive in the background. Depending on its size, this process may take considerable time. For large hard drives, it’s advisable to leave it overnight.
Method 2: Employing the Disk Utility Tool
You can encrypt your external hard drive using the Disk Utility Tool. Keep in mind that this method will erase all your data before encrypting the hard drive, so it’s suitable only for a new hard drive. The Disk Utility Tool is primarily used when you want to encrypt only a part of the drive, not the whole thing. It allows you to create partitions on your hard drive and then encrypt the desired partition.
1. Open the Disk Utility Tool by searching for it in Spotlight or navigating to Finder->Applications->Utilities->Disk Utility. Select your external drive from the left side menu and click the “Erase” button. Note that any existing data on the drive will be deleted during this process.
3. Give the drive a name and then click on the “Format” option. Select “Mac OS Extended (Journaled, Encrypted)” from the drop down menu.
4. Set a strong password and enter a hint if desired. Now, click “Choose” to format and encrypt the drive.
5. After the process, your drive is encrypted, indicated in the description. Refer to the picture.
Using these methods encrypts your external hard drive on Mac. When plugged into any machine, a password prompt appears before accessing its content.
Password Protect External Hard Drive on Windows

Similar to Mac, Windows also includes a built-in disk encryptor named “BitLocker Drive Encryption”. However, note that this function is exclusive to the Pro and Enterprise versions of Windows. Third-party software is necessary to encrypt external hard drives with the home version of Windows. Let’s begin by securing your external drive using the Pro edition of Windows.
Method 1: Utilizing the Built-in Tool in Windows Pro/Enterprise Edition
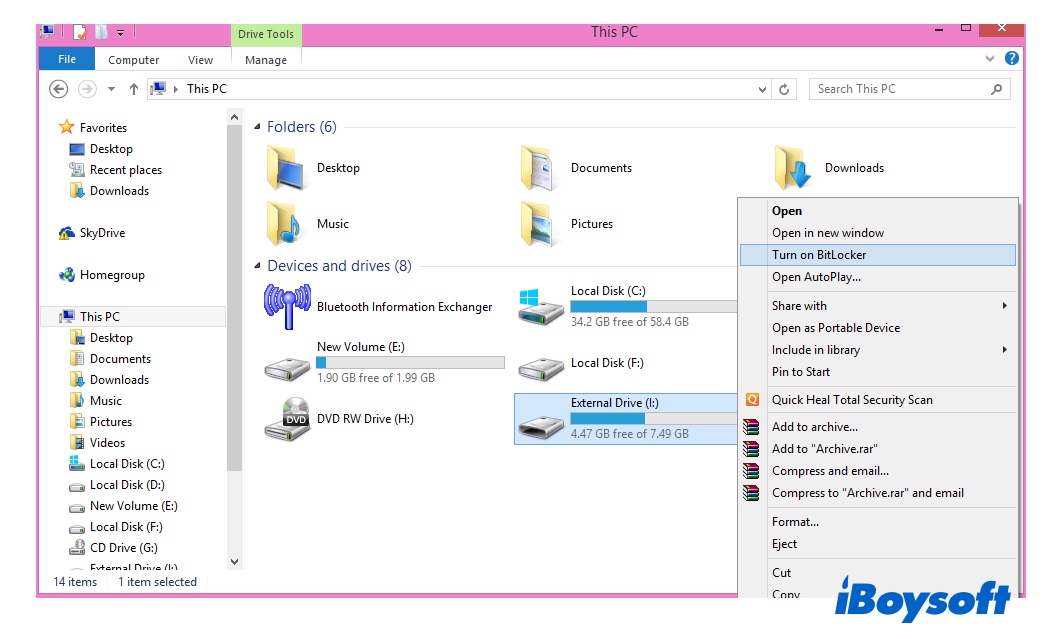
1. Access the “BitLocker Drive Encryption” menu by navigating to Control Panel->System and Security->BitLocker Drive Encryption.
2. By default, BitLocker is disabled for all drives. To initiate encryption, choose the drive and click “Turn on BitLocker”.
3. Enable the “Use a password to unlock the drive” option and input a strong password. Proceed to Next.
4. Secure a backup of your recovery key. This will be necessary if you forget your password. Choose your preferred method; I opted for saving to a file.
5. Initiate the encryption process by clicking the “Start encrypting” button.
Now, simply wait for the encryption to complete. The duration depends on your external drive’s size and its contents.
Method 2: Utilizing Third-Party Software
- Download and install the software by clicking on this link. Once installed, open the program and insert your hard drive. Now, click “Create Volume” and choose the middle option (Encrypt a non-system partition/drive) from the pop-up window. Then, click Next.
2. Choose “Standard VeraCrypt volume” and click Next.
3. On the next page, click select device and do the same on the pop-up menu. Remember to choose the partition option rather than the disk name.
4. On the following page, the first option will delete data before encrypting the drive, while the second will save it. Select your preferred option. Follow the on-screen instructions and click Next until your device is encrypted.
- To decrypt your drive, open the software, select a drive from the menu, then click “Select Device”. Choose your drive as you did in the 3rd step of the encryption process.
2. Click Mount and enter your password in the pop-up. After entering the password, minimize the software and open My Computer. Locate the drive name you selected (“Y” in this case) and double-click to open it. This will display all the content of the external drive.
Encrypt External Drives to Protect Personal Data
Encrypting your external drive to password protect it is crucial for safeguarding your data. Unlike your computer, your hard drive is easily accessible, putting your data at higher risk. Use the above methods to protect your data so no unauthorized person can access it. Let us know in the comments if you encounter any issues while using any of the above methods.

Pritam Chopra is a seasoned IT professional and a passionate blogger hailing from the dynamic realm of technology. With an insatiable curiosity for all things tech-related, Pritam has dedicated himself to exploring and unraveling the intricacies of the digital world.


