OBS, or Open Broadcaster Software, serves as a versatile tool for streaming, broadcasting, and recording. Adding or removing scenes or collections in OBS allows for effective management of various shots, thereby streamlining workflow. Below, we delve into the concept of scene collections in OBS and provide a step-by-step guide on deleting them. This tutorial proves invaluable if you encounter significant lags, FPS issues, or performance drops during streaming or screen recording. Without further ado, let’s explore how to delete scene collections in OBS.
Understanding Scene Collections in OBS
Open Broadcaster Software (OBS) functions as a platform enabling the utilization of multiple scenes, each comprising various sources for desktop recording, game streaming, and more. These sources encompass a wide range of elements, including text, images, audio, video, and camera inputs.
To utilize these sources, scenes are required. Initially, create a scene for source usage. A scene collection entails multiple scenes within one OBS profile. Scenes in OBS can be individually or collectively renamed or deleted.
Deleting Scene Collections in OBS Studio
Deleting a Single Scene
- Open OBS and choose the scene for deletion.
- Click the trashcan icon beneath the “Scenes” tab to delete the selected scene.
Deleting Multiple Scenes
- Access the Scene Collection option in the OBS menu bar.
- A menu will appear with various options: adding a new scene collection, renaming, removing, or selecting a scene collection in OBS.
To delete a scene collection in OBS:

If you encounter difficulties removing a scene collection, follow these steps:
Close OBS and locate its shortcut on your desktop. Right-click the shortcut and navigate to Properties -> Compatibility. Enable “Run as administrator”, then click apply and OK. Restart your device and attempt to delete the scene collection again.
Delete Scene Collection from OBS Files Location
Note: The methods mentioned above may not always be effective. Permission issues with OBS or scene detection errors could be the cause. In such instances, follow the steps below.
Checking File Permissions
- Ensure OBS is installed on the C drive. Close OBS.
- Press the Windows key, type %appdata%, and open the resulting folder.
- Locate and enter the obs-studio folder.
- Access the basic folder, where you’ll find two subfolders. Choose scenes.
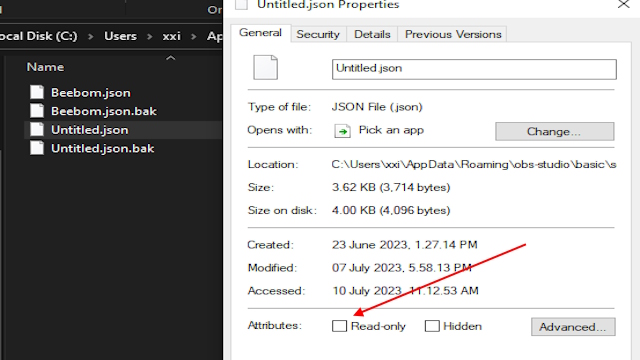
- Check the scenes folder to ensure none of the scene files are read-only. Right-click on each file, go to properties, and verify attributes.
- Launch OBS as administrator, then delete the scene collection from within the application.
Deleting Scenes from Files
- If you still can’t delete scenes, navigate to %appdata% -> obs-studio -> basic -> scenes and remove the unwanted scene collection.
- Empty the recycle bin and restart OBS. The scene collections will be removed.
Consequences of Deleting the Scenes Folder in OBS
If you don’t have a backup of the scenes, they will be permanently deleted from OBS. Check the recycle bin or save the scene collection in a separate folder for backup. After deleting all the scenes, move those files to the folder again, and OBS will automatically add them.
What happens if there are no scene files in the OBS folder?
If the scenes folder or all files are deleted, any previous scene or scene collection will no longer exist in OBS. Once you open OBS, it will start with a default empty scene.

Pritam Chopra is a seasoned IT professional and a passionate blogger hailing from the dynamic realm of technology. With an insatiable curiosity for all things tech-related, Pritam has dedicated himself to exploring and unraveling the intricacies of the digital world.


